11. 构建多种系统架构支持的 Docker 镜像
11.1. docker manifest
我们知道使用镜像创建一个容器,该镜像必须与 Docker
宿主机系统架构一致,例如 Linux x86_64 架构的系统中只能使用
Linux x86_64 的镜像创建容器。
Windows、macOS 除外,其使用了 binfmt_misc 提供了多种架构支持,在 Windows、macOS 系统上 (x86_64) 可以运行 arm 等其他架构的镜像。
例如我们在 Linux x86_64 中构建一个 username/test 镜像。
FROM alpine

CMD echo 1
构建镜像后推送到 Docker Hub,之后我们尝试在树莓派 Linux arm64v8
中使用这个镜像。
$ docker run -it --rm username/test
可以发现这个镜像根本获取不到。
要解决这个问题,通常采用的做法是通过镜像名区分不同系统架构的镜像,例如在
Linux x86_64 和 Linux arm64v8 分别构建 username/test 和
username/arm64v8-test 镜像。运行时使用对应架构的镜像即可。
这样做显得很繁琐,那么有没有一种方法让 Docker 引擎根据系统架构自动拉取对应的镜像呢?
我们发现在 Linux x86_64 和 Linux arm64v8 架构的计算机中执行
$ docker run golang:alpine go version 时我们发现可以正确的运行。
这是什么原因呢?
原因就是 golang:alpine 官方镜像有一个 `manifest
列表 <https://docs.docker.com/registry/spec/manifest-v2-2/>`__。
当用户获取一个镜像时,Docker 引擎会首先查找该镜像是否有 manifest
列表,如果有的话 Docker 引擎会按照 Docker
运行环境(系统及架构)查找出对应镜像(例如
golang:alpine)。如果没有的话会直接获取镜像(例如上例中我们构建的
username/test)。
具体流程可见下图:
11.1.1. 开启manifest功能
manifest是作为docker客户端的子命令存在,不过这个子命令目前处在实验性中一般没有开启。 我们需要手动开始这个子命令的功能。开启过程如下:
编辑配置文件config.json应用实验性功能:
docker 的默认配置文件config.json是在$HOME目录下的.docker目录下。 编辑config.json文件,若目录和文件不存在手动创建。
1$ vim ~/.docker/config.json
2{
3  "experimental": "enabled"
4}
编辑守护进程配置文件daemon.json开启实验性功能:
编辑daemon.json,若目录和文件不存在手动创建
1$ vim /etc/docker/daemon.json
2{
3    "experimental": true
4}
重启docker:
1$ systemctl daemon-reload
2$ systemctl restart docker
3$ docker manifest --help  #查看manifest帮助信息
验证manifest实验功能
我们可以使用
$ docker manifest inspect golang:alpine查看这个manifest列表的结构。$ docker manifest inspect golang:alpine { "schemaVersion": 2, "mediaType": "application/vnd.docker.distribution.manifest.list.v2+json", "manifests": [ { "mediaType": "application/vnd.docker.distribution.manifest.v2+json", "size": 1365, "digest": "sha256:5e28ac423243b187f464d635bcfe1e909f4a31c6c8bce51d0db0a1062bec9e16", "platform": { "architecture": "amd64", "os": "linux" } }, { "mediaType": "application/vnd.docker.distribution.manifest.v2+json", "size": 1365, "digest": "sha256:2945c46e26c9787da884b4065d1de64cf93a3b81ead1b949843dda1fcd458bae", "platform": { "architecture": "arm", "os": "linux", "variant": "v7" } }, { "mediaType": "application/vnd.docker.distribution.manifest.v2+json", "size": 1365, "digest": "sha256:87fff60114fd3402d0c1a7ddf1eea1ded658f171749b57dc782fd33ee2d47b2d", "platform": { "architecture": "arm64", "os": "linux", "variant": "v8" } }, { "mediaType": "application/vnd.docker.distribution.manifest.v2+json", "size": 1365, "digest": "sha256:607b43f1d91144f82a9433764e85eb3ccf83f73569552a49bc9788c31b4338de", "platform": { "architecture": "386", "os": "linux" } }, { "mediaType": "application/vnd.docker.distribution.manifest.v2+json", "size": 1365, "digest": "sha256:25ead0e21ed5e246ce31e274b98c09aaf548606788ef28eaf375dc8525064314", "platform": { "architecture": "ppc64le", "os": "linux" } }, { "mediaType": "application/vnd.docker.distribution.manifest.v2+json", "size": 1365, "digest": "sha256:69f5907fa93ea591175b2c688673775378ed861eeb687776669a48692bb9754d", "platform": { "architecture": "s390x", "os": "linux" } } ] }
可以看出
manifest列表中包含了不同系统架构所对应的镜像digest值,这样 Docker 就可以在不同的架构中使用相同的manifest(例如golang:alpine) 获取对应的镜像。
小技巧
开启docker的实验性功能后docker pull可以拉取指定平台镜像如下:
docker pull --platform arm64 xxxx
–platform:该参数是用于拉取指定平台的镜像,也是实验性功能,在上面步骤中开启后就会出现。通过该参数可以手动指定需要的CPU平台镜像,而不用自动去识别。
11.1.2. 构建镜像
首先在 Linux x86_64 构建 username/x8664-test 镜像。并在
Linux arm64v8 中构建 username/arm64v8-test
镜像,构建好之后推送到 Docker Hub。
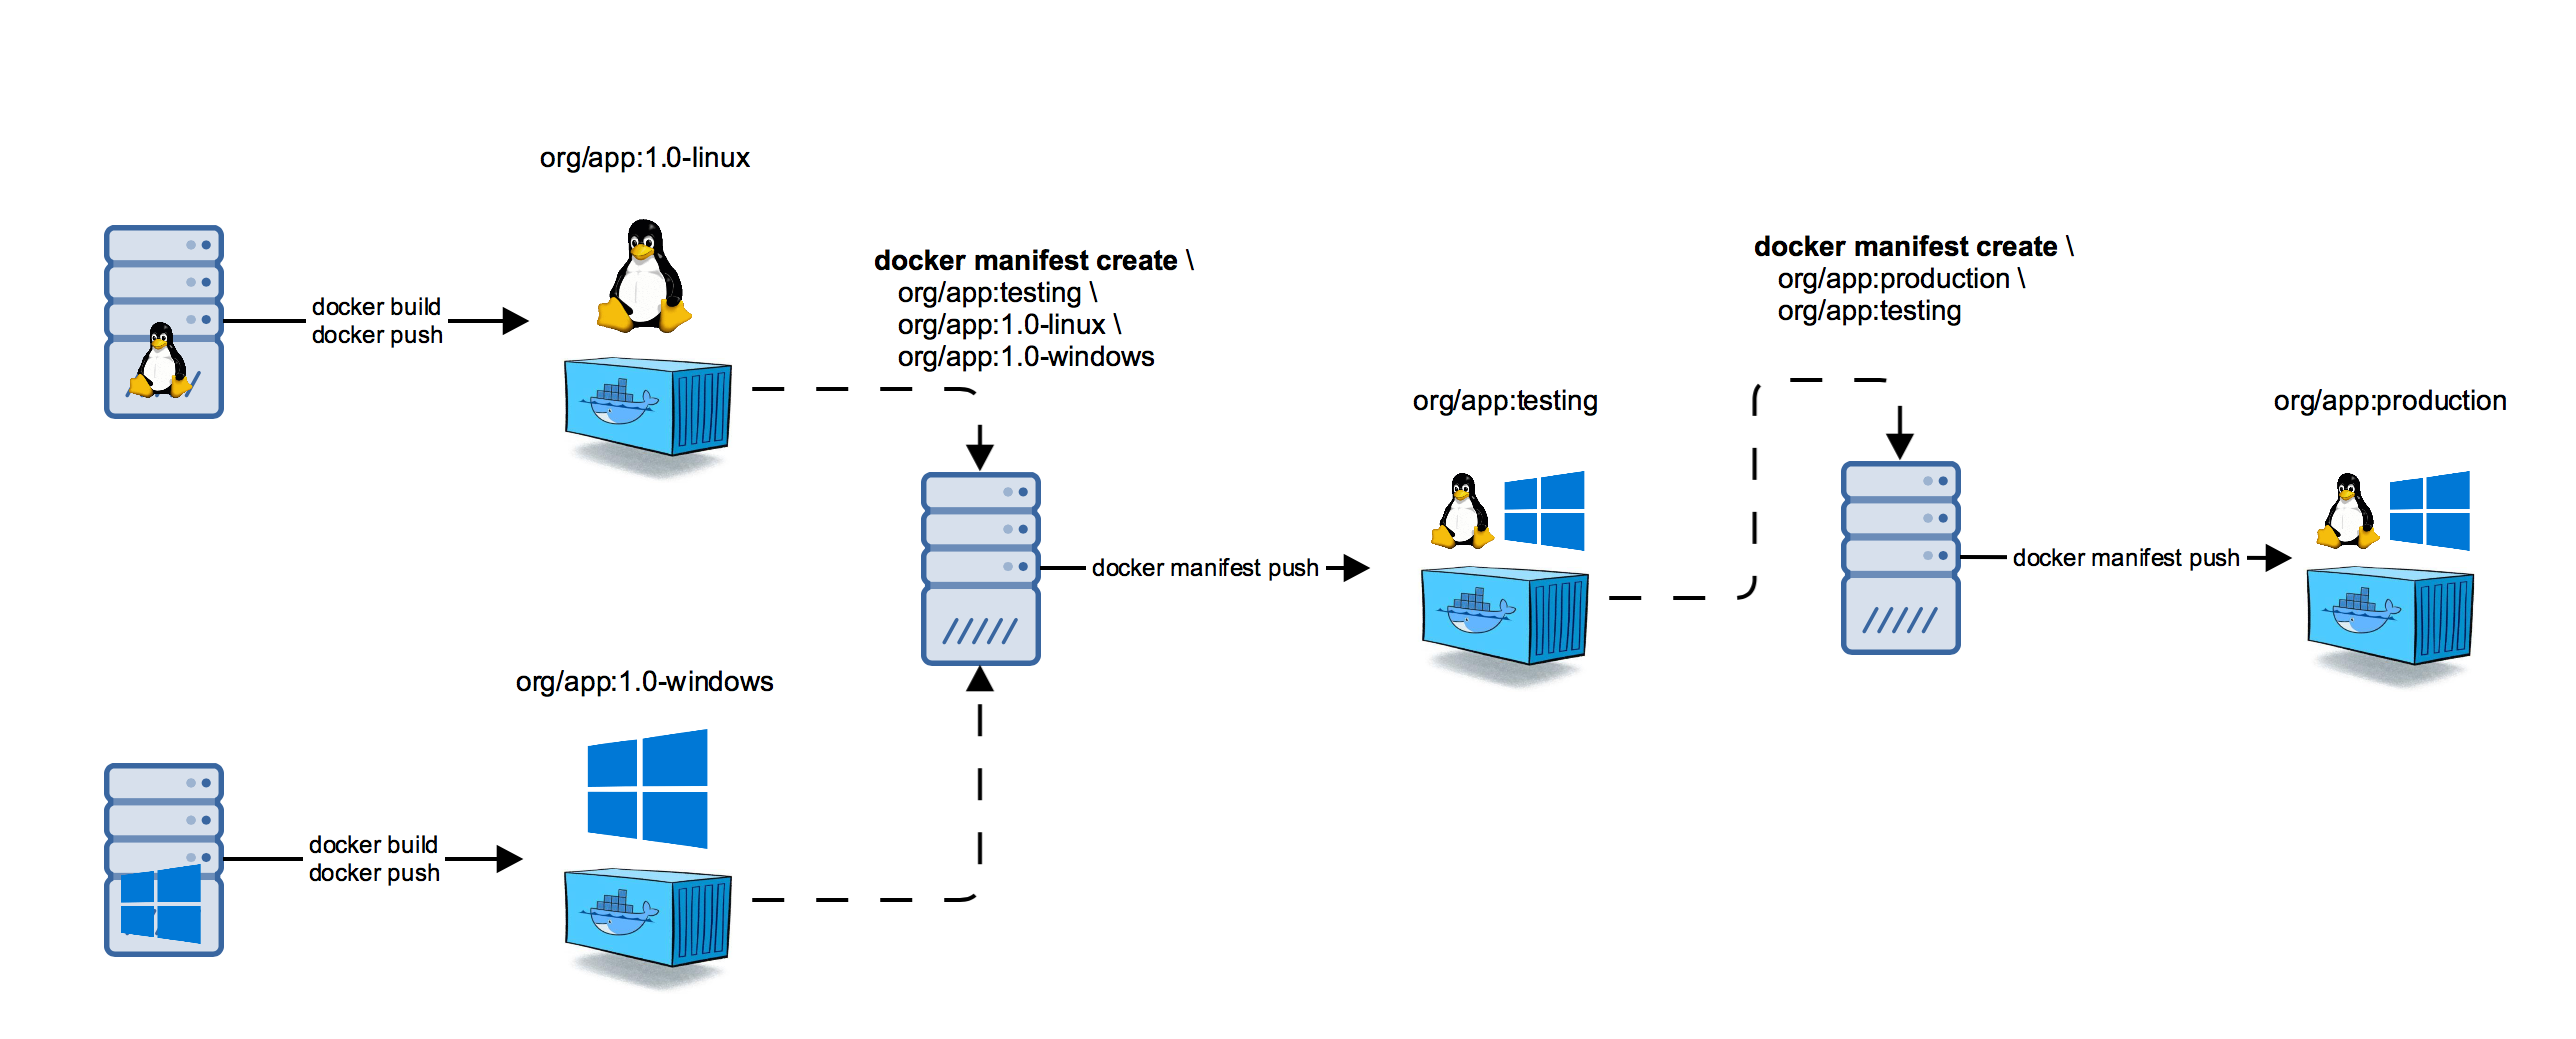
11.1.3. 创建 manifest 列表
# $ docker manifest create MANIFEST_LIST MANIFEST [MANIFEST...]
$ docker manifest create username/test \
      username/x8664-test \
      username/arm64v8-test
当要修改一个 manifest 列表时,可以加入 -a,--amend 参数。
11.1.4. 设置 manifest 列表
# $ docker manifest annotate [OPTIONS] MANIFEST_LIST MANIFEST
$ docker manifest annotate username/test \
      username/x8664-test \
      --os linux --arch x86_64

$ docker manifest annotate username/test \
      username/arm64v8-test \
      --os linux --arch arm64 --variant v8
这样就配置好了 manifest 列表。
11.1.5. 查看 manifest 列表
$ docker manifest inspect username/test
11.1.7. 测试
我们在 Linux x86_64``Linux arm64v8 中分别执行
$ docker run -it --rm username/test 命令,发现可以正确的执行。